|
 This is where you define some additional information on what to
do with the object's coordinates, in other words: it's PSR data. First off, you choose here if you want to use local or
global coordinates. Local coordinates are what you see in the Coordinates
Manager when it is set to 'Object' instead of 'World'. It's the
coordinates of the object relative to it's direct parent. Global
coordinates, on the other hand, takes the object's coordinates
in world space, in other words, relative to the world's axes.
They're what you see in the coordinates manager when it's set
to 'World' instead of 'Object'. This is where you define some additional information on what to
do with the object's coordinates, in other words: it's PSR data. First off, you choose here if you want to use local or
global coordinates. Local coordinates are what you see in the Coordinates
Manager when it is set to 'Object' instead of 'World'. It's the
coordinates of the object relative to it's direct parent. Global
coordinates, on the other hand, takes the object's coordinates
in world space, in other words, relative to the world's axes.
They're what you see in the coordinates manager when it's set
to 'World' instead of 'Object'.
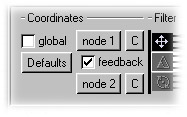
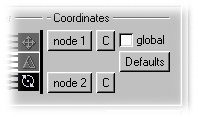
But more importantly, the coordinates section of the Puppeteer
dialog is where you define the object's two nodes.
|
the nodes
Each of the objects has two nodes in Puppeteer, which are nothing more than two locations in 3D space. Think of them as special settings of the coordinates manager, each having their own position, scale and rotation. When Puppeteer is linking two objects, these nodes of the two objects are mapped together. In other words, Puppeteer will look at the difference between the source object's current state (it's position, scale and rotation), and the ones set in it's two nodes. It then takes this difference to the destination object, and uses those two nodes to calculate the state the destination object should be in. So when the source object is exactly on the coordinates described in node 2, the destination object will have to be in the exact coordinates described in the destination's node 2. Of course, it only works like this if you choose to directly link both objects position channels to eachother. If you start feeding the source object's position to the destination object's scale, the source nodes' position settings will be mapped onto the destination nodes' scale settings.
A quick example to clearify the main use of this: Imagine you
have two objects, A and B, and you want object B to move twice
as fast as object A on the Y axis. In other words: for each 100m
object A moves in Y, you want object B to move 200m in Y. This
is exactly what the nodes do. You set the source nodes' Y-positions
to 0m and 100m, and the destination nodes' Y positions to 0m and
200m. You could also have set the destination nodes' Y position
to 0m and -200m and have object B move downwards twice as fast
as object A moves upwards. |
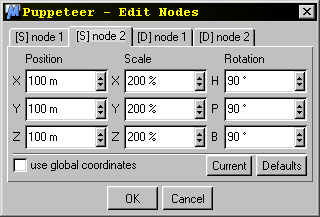
To manually set an object's nodes, simply click on the appropriate
node button in the object's coordinates section (so node1 or node 2). This takes you to a dialog which looks a lot like Cinema4D's
Coordinates Manager, with some extra bells and whistles. First
off, there are four tabs in this window, and it depends on which
button you have clicked which tab is currently in the foreground.
The tabs' names are [S] node 1, [S] node 2, [D] node 1 and [D] node 2, in which [S] stands for Source and [D] stands for Destination. This allows you to quickly compare the
four nodes to eachother. Other than the tabs, the nodes dialog
also allows you to use the current coordinates of the source or
destination object by pressing the button Current. Of course, you can set the coordinates to global if you wish, just like in the main Puppeteer dialog. Also, the
button Defaults sets the nodes back to the default Puppeteer values, which are
more than adequate in a lot of cases.
Back in the main Puppeteer interface, you'll see that the Defaults button is found here as well. It does exactly the same as the
one in the nodes dialog.
The real power of the nodes becomes apparent when you start using
the little C buttons next to them, which work the same as the Current buttons
in the nodes dialog. They do nothing more than copying the object's
current position, scale and rotation to the appropriate node.
But this simple action alows you to move both the source and destination
object to one 'node' by hand, press C, put the objects on the
other node, press the other C, and their relationship is fixed!
Imagine you want a slider to rotate a bone. Assuming that you
have already set up the correct linking and filter settings (more
on these later), and the tag is deactivated: simply move the slider
into it's 'bottom' position, rotate the bone like it should be
at that slider position, press the C buttons of both the objects'
1st node. Next, you move the slider to it's upper position, rotate
the bone to how it should be rotated like in that situation, and
press the remaining two C buttons. Next, re-activate the tag.
Whallah! Instant slider!
There is another way to define nodes though. Directly below the
object definition area's, there's a checkbox called Use Timeline for Nodes. With this option turned on, the nodes buttons in the objects'
coordinates settings get greyed out. |
|
What this allows you to do is that, instead of storing the nodes'
data directly inside the Puppeteer tag, you can point the tag
towards a certain point in time, and tell it that the recorded
position, rotation and scale it finds on the defined objects there,
is what should be in the objects' nodes. This has two very flexible
uses. First, it allows you to re-define the objects' nodes simply
by re-recording their position, rotation and scale at the appropriate
times in the timeline, without having to tell the tag that the
data has been changed. Second, this makes it extremely simple
to re-use tags across different objects in the same document.
If you take care that all the object checked and influenced by
Puppeteer have their two appropriate nodes recorded at the same
times in the timeline, simply copying the Puppeteer tag to another
object will automatically update it to the appropriate nodes.
Maybe a quick example will better illustrate the useablilty of
this.
Imagine you have an incredible intricate structure such as a bird's
wing, and you want to be able to open and close it by moving one
slider. You could give each element in the wing a puppeteer tag
pointing towards the same control object as it's source object.
Because none of these elements will (probably) rotate in the exact
same way, that would mean that you'd have to manually define the
nodes for each element, adding up to quite a number of clicks
on the C buttons! If you instead use the Use Timeline for Nodes
option, you can record a pose for the entire wing and all it's
elements on the two frames specified in the Puppeteer tag. On
Node 1 Time, you record how the wing looks if it is closed, and
on Node 2 Time, you record the wing fully opened. Next, at the
same points in time, you record the two extreme positions of the
slider object that should open the wing. Next, you create one
Puppeteer tag, point it at the slider object, link the appropriate
position channel to the three rotation channels, turn on Use Timeline
for Nodes and set the framenumbers. Then you copy the Puppeteer
tag to all neccesary elements and you're done!
Needless to say, with Node 1 Time you define at which frame node 1 is recorded, and with Node 2 Time you define at which frame node 2 is recorded. Bear in mind that
these values do not change automatically when you hange a document's
FPS setting!
Keep in mind though, that Puppeteer has to secretly animate the source and destination objects if you use the Timeline option. This means that in this setting the plugin runs a bit slower than when you have manually defined nodes. Luckily, once the object responds correctly to it's timeline-nodes, you can turn off the option, and Puppeteer will have automatically filled in the values in the nodes!
feedback
This is an option especially built in for easy creation of sliders
and control objects. When you create a slider, you most probably
want it to only move on the axis that actually controls the other
object. There's no use having a slider that moves in 3D space
completely free, while only it's Y position is of any influence
in the scene. Feedback simply looks at what information the object is sending out, and
limits the movement of the object to just that type of movement.
The other types of movement will be fixed to the values defined
in node 1. On top of that, if you have set limits to the destination
object, (explained further in the curve section), the source object
will respect those limits as well!
Of course, this option is only available in the source object's
coordinates settings.
|